Before home buyers pick up the phone, they spend weeks browsing listings online.
An internet data exchange (IDX) integration lets you add those listings to your website, capturing leads before they bounce to a competitor.
In this guide, you’ll learn how IDX works, which features matter most and how to set it up on your own site. You’ll see how to turn your website into a lead-generation tool that keeps buyers engaged.
IDX in real estate key takeaways
IDX in real estate is a system that shows live property listings from the multiple listing service (MLS) on your website.
When visitors search your site, the IDX system pulls up the latest property data and displays it under your brand.
To add IDX to your website, choose a plug-in solution or an all-in-one provider and get approval from your local MLS.
Pipedrive’s CRM helps real estate agents automate lead capture and nurture long-term prospects. Try it free for 14 days.
What is IDX in real estate?
IDX is a system that enables real estate agents to display live property listings on their own websites, whether they’re part of a large brokerage or working independently.
When someone searches for homes, they see the same fresh information that appears on major syndication portals like Zillow and Trulia. The difference is, they’re doing it on your site, where you can capture their details and build rapport.
Here’s what it looks like in practice:
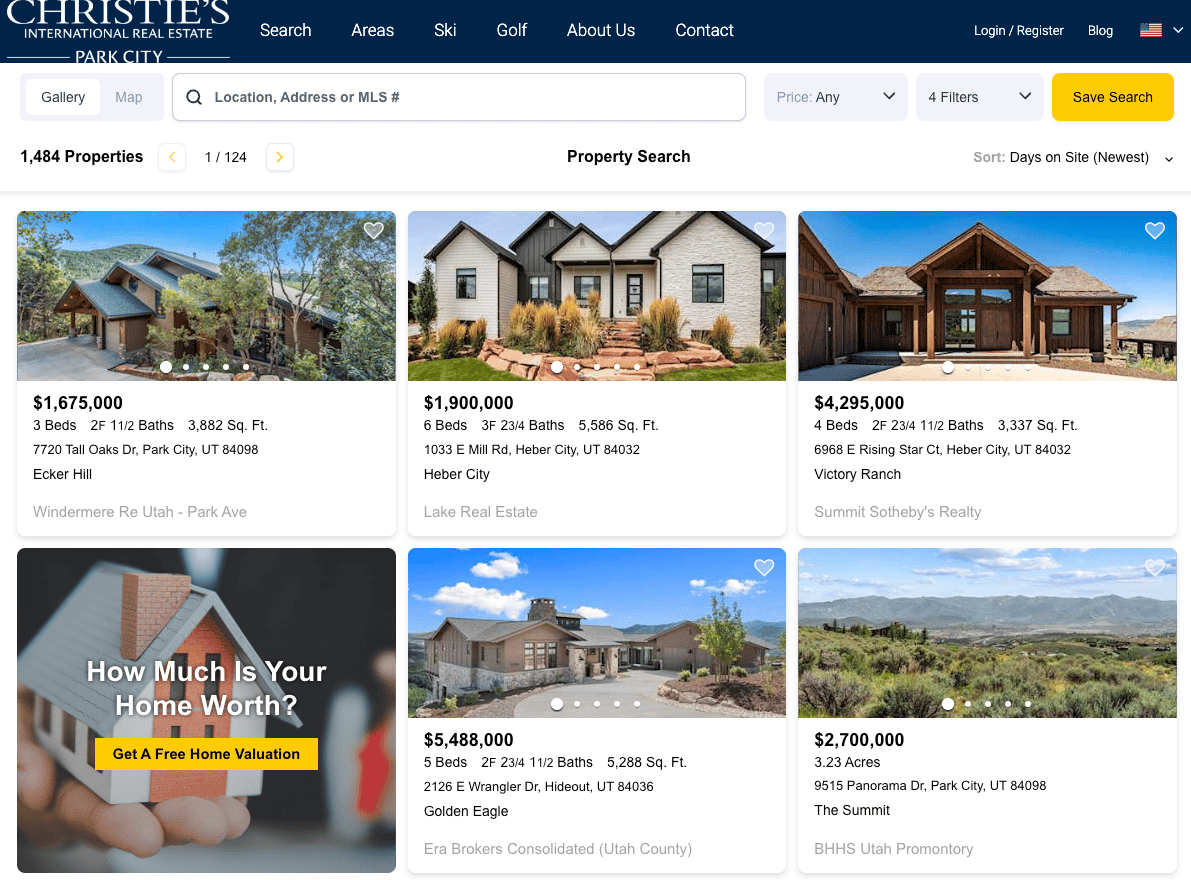
So what does IDX mean in real estate?
Think of it like a news feed. Instead of visiting different websites for updates, users can see all the latest stories through your personalized feed.
Here’s why IDX makes sense for your business:
Benefit of using IDX | Why it matters |
You generate exclusive leads directly from your website. | Every visitor who registers to save searches or view contact details becomes your lead, rather than coming from a portal where other agents compete. |
You keep real estate prospects in your ecosystem, rather than on third-party portals. | Instead of sending buyers to Zillow, where other agents’ listings might distract them, they stay on your site and associate you with their search. |
You automatically route real estate leads into your sales CRM. | When someone registers or submits an inquiry, their details can flow straight into your real estate CRM so you can follow up immediately. |
You gain an SEO lead generation advantage on your website. | Each property listing is a unique page Google can index. You’ll start generating steady organic traffic and leads, which is a huge competitive advantage. |
You track client search activity to understand their needs before the first cold call. | You’ll see which properties each lead views, showing you their budget, preferred areas and must-have features. |
Before setting up your own IDX feed, make sure you really understand how it works.
How does IDX work in simple terms?
IDX works by creating a direct connection between your local property database and your website.
Here’s the basic process:
In the real estate industry, realtors list properties on a shared database called the multiple listing service. The MLS is like a central filing service that all licensed agents in an area can access.
IDX providers then convert the MLS data for websites, making sure search filters work and every real estate listing shows up correctly.
When someone visits your website and searches for homes, your IDX system checks the MLS database. The results appear on your site as if you maintain all those listings yourself.
Here’s what an MLS listing looks like, showing all relevant information about the property:
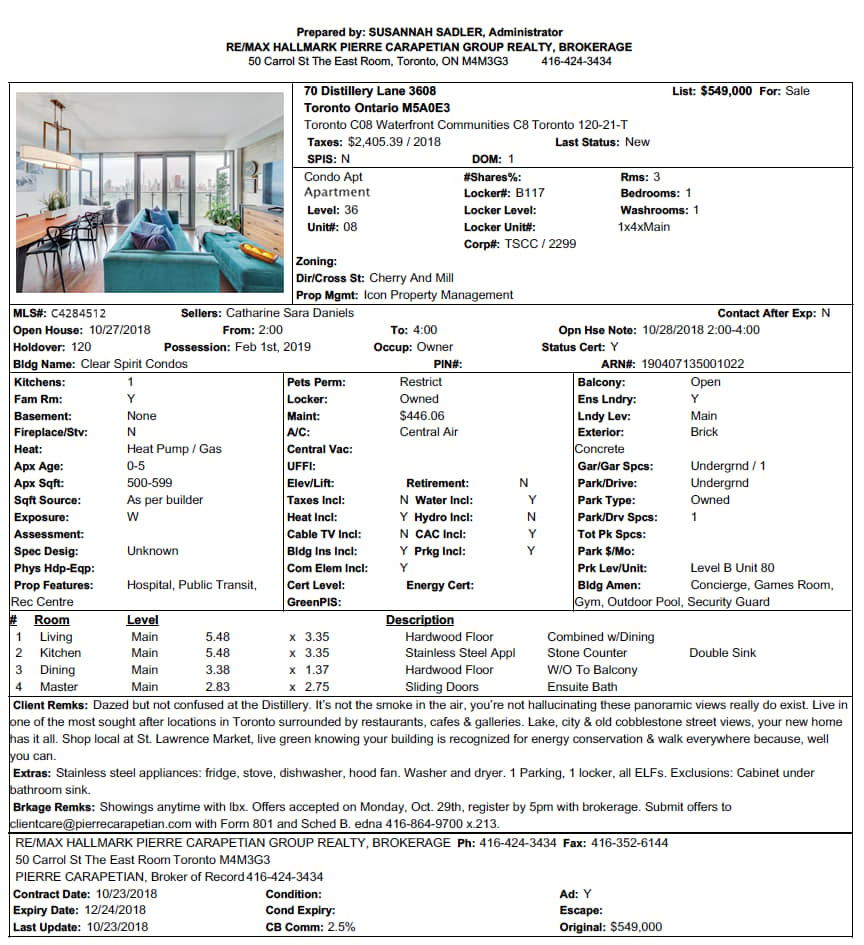
When one agent lists a house on the MLS, every other agent can see it and show it to their buyers. You’ll need the listing agent’s permission and follow the rules about sharing the sales commission.
What’s the difference between IDX, Zillow and the MLS? The MLS is the official database where agents list properties. Zillow takes MLS data and shows it online, but they control the visitor relationship. An IDX lets you take control of all of this on your own website.
Now that you know how IDX works, it’s time to put it to use. Adding IDX to your real estate website takes a few steps, and the result is worth it.
How to add IDX to your real estate website
Adding an IDX feed to your website transforms it from an online brochure into a lead-generating machine.
Displaying live property listings gives buyers a reason to stick around, search for properties and connect with you.
Here’s how to add IDX to your own website in four easy steps.
1. Check your local MLS rules and requirements
Before you display any IDX listings, you need official permission from your local MLS. It guards data carefully to ensure only licensed real estate professionals use it.
Each MLS has different rules about displaying listings. The National Association of Realtors (NAR) influences many of these policies.
Some standard requirements include:
You must be an active MLS member in good standing
Your agent website needs to display specific disclaimers or attribution text
You might need MLS approval before going live with IDX
Some MLS systems require specific data refresh rates or search limitations
First, contact your local real estate board or MLS provider and ask it about its process for getting an IDX data feed. You’ll need to fill out paperwork, agree to the terms of use and pay an access fee.
Just make sure you have the right MLS. There are over 500 independent, regional MLSs in the US. An agent working in a large metro area might need data from more than just one.
2. Choose your IDX solution
Once you have approval, you need the right real estate sales stack to get listings from the MLS onto your website.
There are two main choices: an all-in-one provider or a plugin for your site.
An all-in-one provider is the easiest, most hands-off approach. These companies specialize in building real estate websites with IDX fully integrated from the start. They handle the technical setup, design and any ongoing maintenance.
Companies like IDX Broker provide hosting, website design and IDX functionality as one package. Here’s what one of IDX Broker’s hosted websites looks like:
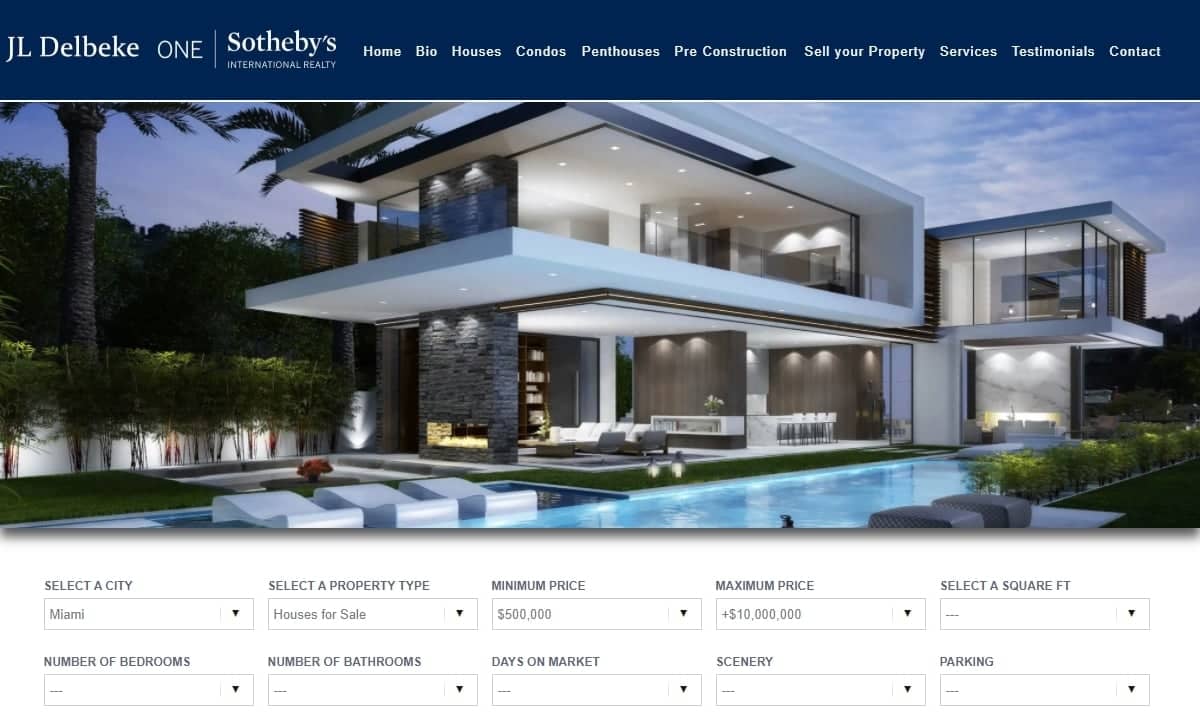
While it costs more monthly, it removes the headaches of managing hosting and plugins separately.
If you already have a website that works well for you (like one using WordPress), a plugin is your best bet.
You can add plugins to your website to connect the MLS feed and show active listings. While it’s more flexible, you’ll need some technical know-how to set it up yourself.
Note: You’ll need robust hosting to handle the extra load since IDX systems run constant queries and save many images. Double-check with your hosting provider about your plan’s capabilities.
3. Select the right provider or plugin
IDX solutions offer different features, perks and pricing.
Here are a few things to investigate:
Call the provider and confirm they have a feed from your local MLS board
Ask about how often they refresh data from your MLS
Find out if they’ve had any recent outages or issues
Confirm they support all property types you want to show
If everything looks good, make a note of that IDX solution. Once you have a shortlist of options, compare features.
What to look for in an IDX solution for real estate
Here are the key IDX features to consider and how they’ll benefit your real estate
website:
IDX feature | Why it matters |
Mobile-first design | The majority of your potential clients will search on their phones. Your IDX should provide a flawless user experience on any screen to prevent leads from falling off. |
Smart lead capture forms | Your IDX system should prompt visitors to register to save searches, favorite properties or request viewings. It’ll help you create a lead funnel to turn traffic into leads. |
Your IDX is only useful if you keep your leads. Connect it to your CRM to add lead information straight into your sales pipeline. | |
Advanced search filters | Buyers want to search by map, school zones, prices or specific features. The better your property search tool, the longer web visitors stay on your site. |
The best IDX solutions show you which properties registered leads view and save. You can understand client needs before you call them. | |
SEO-friendly URLs | Look for providers that create unique, search-engine optimized URLs for property pages. |
Load time optimization | Property pages should load in under three seconds. Ask the provider about image compression and caching capabilities to confirm what’s possible. |
Beyond the core features, consider what other marketing tools the provider offers. Some include built-in features for creating property landing pages or sharing listings on social media, adding more value.
Most importantly, they should have a reliable connection to your specific MLS.
Some providers claim to work with hundreds of MLSs but actually get data through third-party feeds that can be slower or less reliable.
Additionally, customization options vary between providers. Some give you total control over colors and layouts, while others only provide basic branding options.
If you have a particular design in mind, ensure your chosen solution supports that customization.
4. Integrate your IDX solution and check compliance requirements
Once you’ve chosen a provider, all you need to do is integrate it with your website.
The process will differ depending on whether you used a plugin or a complete solution.
If you chose an all-in-one provider: It will handle most things. It’ll use the credentials from your MLS to connect the data feed, build the search pages and let you know when it’s ready to launch.
If you chose an IDX plugin: You or your web developer will install the plugin on your website. Enter your MLS credentials to activate the feed and change the settings to match your brand positioning.
Either way, you’re probably looking at around 1–3 weeks for full setup and testing.
Upload high-quality versions of your logo and any brand elements. Your IDX pages should feel like part of your website, not like a completely different site that happens to share your logo.
Once you set it up, test everything:
Run searches for different property types and price ranges
Test the mobile experience
Save favorites and ensure they remain on your profile
Fill out inquiry forms to verify leads flow to your CRM
Check that all required MLS attributions display properly
Verify property images load correctly and aren’t distorted
Test search filters to ensure they comply with fair housing requirements
Remember: MLS compliance isn’t optional. Getting it right means you’ll have no problems displaying the feed on your website. Use the MLS’s exact wording for attribution and show it on every page that has listing data.
It’s usually something like “Listing information courtesy of Regional MLS” with the current date and time. Some MLSs want this in a prominent spot, while others are fine with a smaller font at the bottom of the page.
Also, double-check whether your MLS needs you to show agent contact information alongside each property. Some boards mandate this and others let you show only your own details.
How IDX and a CRM can work together for your real estate business
You can turn website visitors into lifelong clients by connecting your IDX listings to your CRM’s real estate sales process.
An IDX website acts like your digital storefront, attracting buyers with a live feed of every property for sale. The CRM is your command center, managing your contacts and deals.
On their own, they’re both useful tools. When you connect them, you create an automated sales system that guides sales prospects from their first click to a closed real estate transaction.
Using Pipedrive as a CRM example, here are three ways this integration can transform your business to close more deals.
1. Automate lead capture for instant follow-up
Automating your lead capture means you spend less time manually entering data into your CRM.
Speed matters most when converting customers. When you automate real estate lead generation in Pipedrive, you get instant notifications to follow up within minutes. You can even set up welcome emails that send the second someone registers. Here’s how to do it.
First, log in to your Pipedrive account and click your profile picture at the top right corner. Select “Personal preferences” > “API” from the menu on the left.
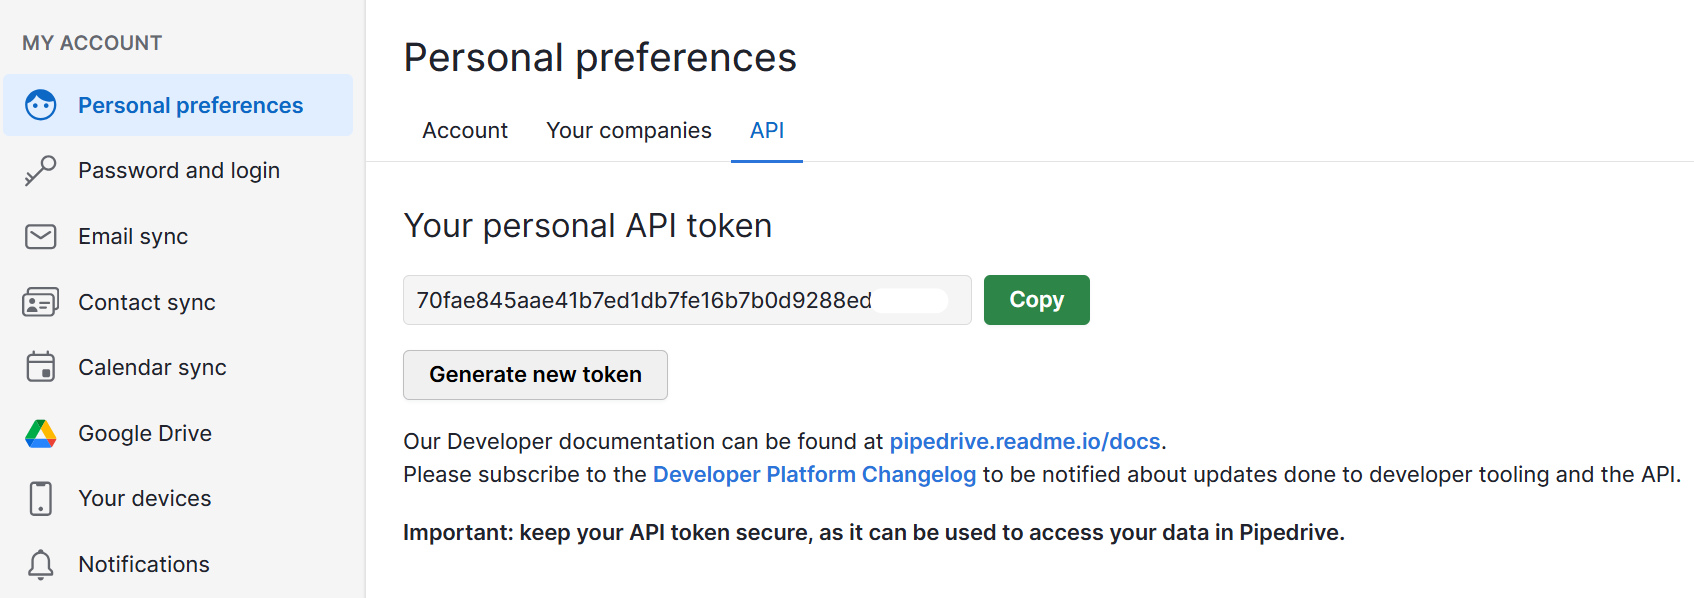
Copy your CRM API token (a long string of letters and numbers) to connect Pipedrive to your IDX system.
Next, create your real estate pipeline stages. Click the gear icon to open “Settings”, then select “Pipelines”. Choose “Add stage” and create pipeline stages like “New website lead”, “Qualified lead” and “Deal won”.
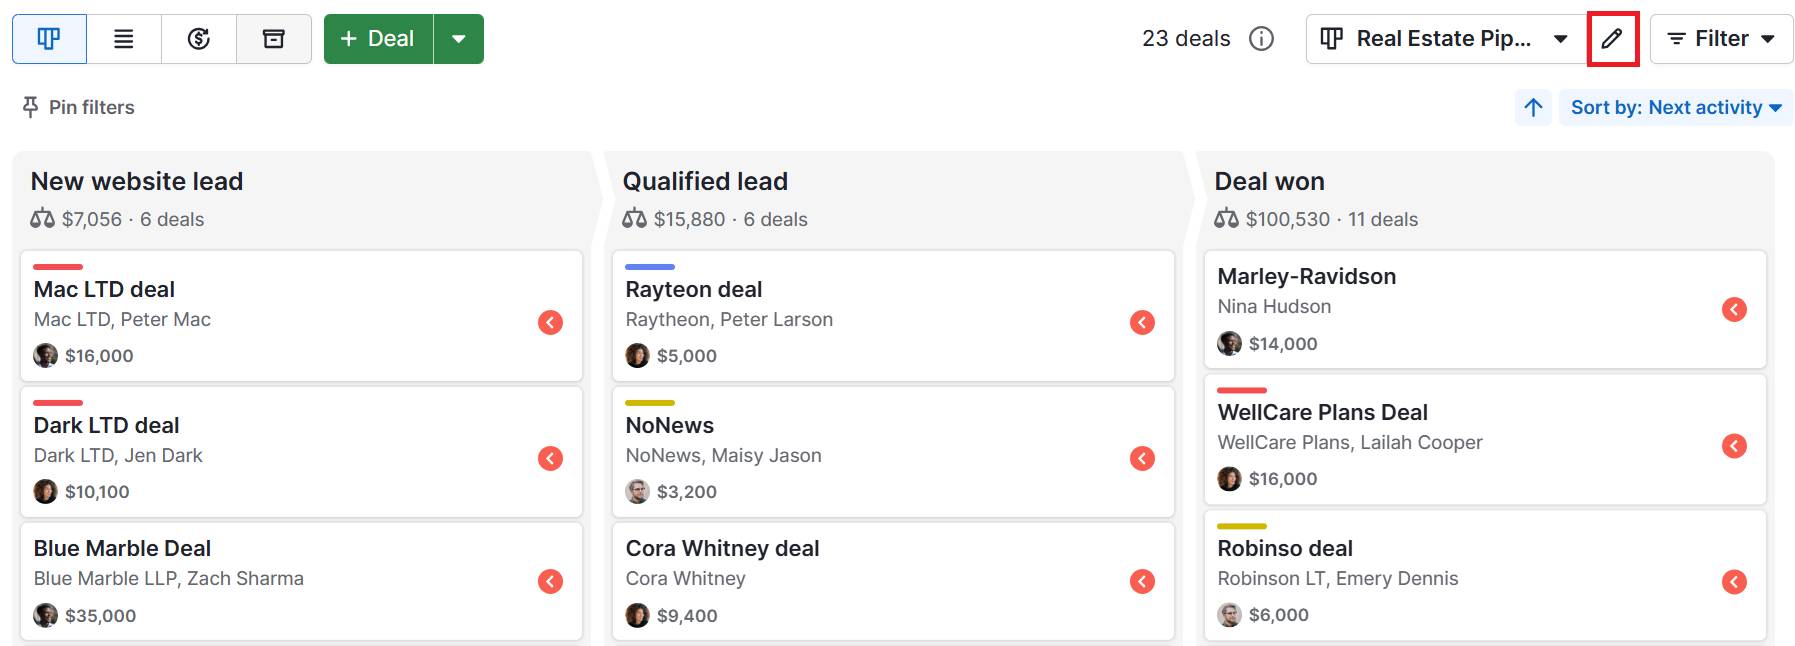
Now connect your IDX provider. Go to your IDX dashboard and look for a setting like “Integrations” or “CRM”. Every IDX software will be different, so check the guides or contact customer support if you have trouble.
Paste your API token and choose which pipeline receives new leads. Select the starting pipeline stage and save your settings.
Next, set up workflow automation for your welcome emails. In Pipedrive, go to “Settings” > “Automations”. Choose “+ Create automation” and set the trigger as “Deal created”.
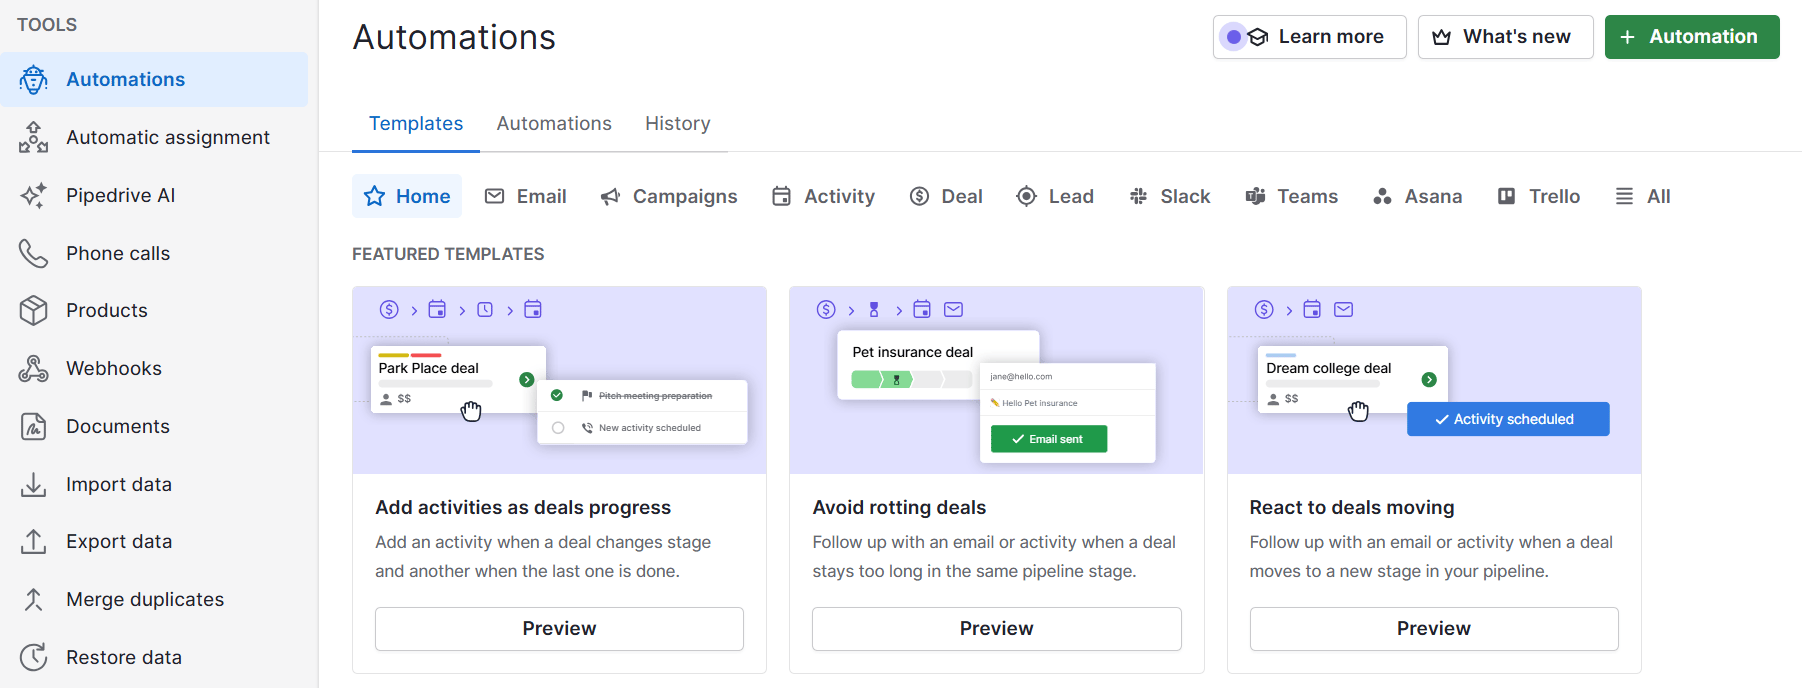
Add the action “Send email” and write an email template that greets your lead and gives them a heads up that you’ll call them soon. Use merge tags for the lead’s name and property address to personalize your messaging.
You can also use Pipedrive’s AI email writer to fine-tune your sales email template. Give it a simple prompt and it’ll generate an email template that helps you enrich leads.
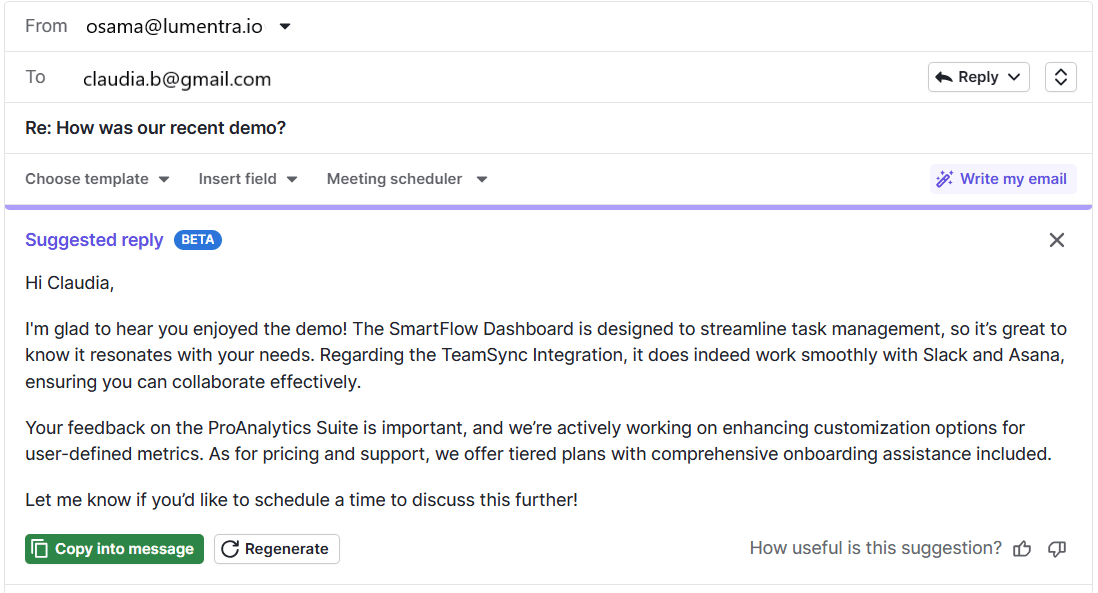
Finally, test your setup. Visit your IDX website and register as a new user with a test email address. Save a property or request information, then check Pipedrive to confirm the new deal appears in the correct pipeline stage.
Pipedrive in action: Real estate network J’achète en Espagne struggled to manage its leads. The team integrated Pipedrive with Zapier to automate lead filtering and personalized follow-ups, saving significant time. As a result, it increased revenue by 20% in just half a year.
2. Gain deeper insights for smarter conversions
One of the advantages of an IDX and CRM integration is the data it gives you.
Instead of making blind calls, you can have value-driven conversations based on a lead’s search behavior.
This data is the key to faster conversions. Here’s how to find these insights in Pipedrive.
First, find the lead’s activity log. Open the new deal that Pipedrive created in your pipeline. Some IDX integrations will add the lead’s browsing activity as a note or custom field inside the deal’s detail view.
Look for details like:
Properties viewed – list of the specific addresses they clicked on
Searches saved – the exact criteria they’re using (e.g., “4 bedrooms in Denver, CO,” “Price < $850,000”)
Properties favorited – the listings they have saved, which indicate a high level of interest
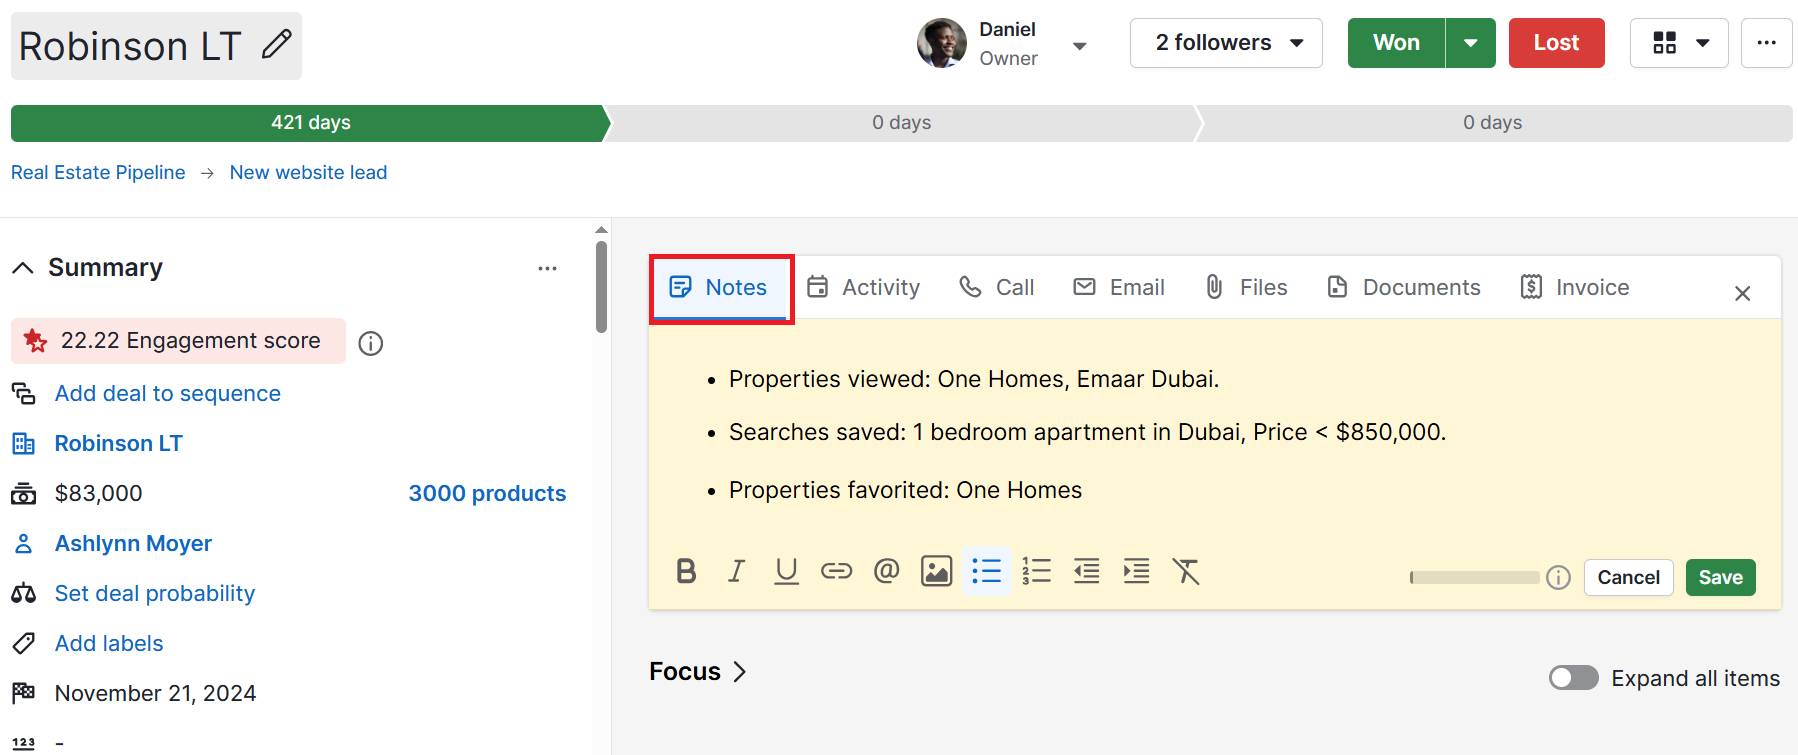
Next, analyze this data to build a client profile. Before you call, you can identify their preferred suburbs, budget and must-have features.
Now, use this information to have a smarter first conversation. Instead of a generic introduction, you can provide immediate value.
Generic approach: “Hi, I saw you signed up on my website. Are you looking to buy a home?”
Insight-driven approach: “Hi, I saw you saved a few 3-bedroom homes in the Capitol Hill area. I know that neighborhood well and a great property just came on the market that isn't on the portals yet. Do you have a minute to chat about it?”
Finally, use custom filters to prioritize your hottest leads.
If your IDX provider can sync data like “Last Seen” or “Number of Properties Saved” to Pipedrive, you can create custom fields for this information under Settings > Data fields.
Then, go to your “Deals” view and create a new filter to show you leads who have been active in the last seven days and have saved more than five properties. You’ll focus your energy on buyers who are actively searching and most likely to convert.
Note: Every IDX solution is different, and some don’t automatically link lead data to your CRM. Check with your provider to make sure they offer this feature.
3. Nurture long-term leads with targeted real estate marketing
The key to converting leads is to build trust and nurture them through consistent, relevant real estate marketing.
Most of the leads from your website won’t be ready to buy a home immediately.
In Pipedrive, you can create custom fields to store IDX search criteria. Go to Settings > Data fields and select “Add custom field”.
Set up fields for the data you want to track, like preferred city, price range or number of bedrooms. Your IDX might be able to send these to your CRM automatically, but if not, you’ll need to add it manually.
Next, build a targeted filter to segment your contacts. Go to the “People” tab in the left-hand menu. Click on the filter dropdown menu and select “+ Add new filter”.
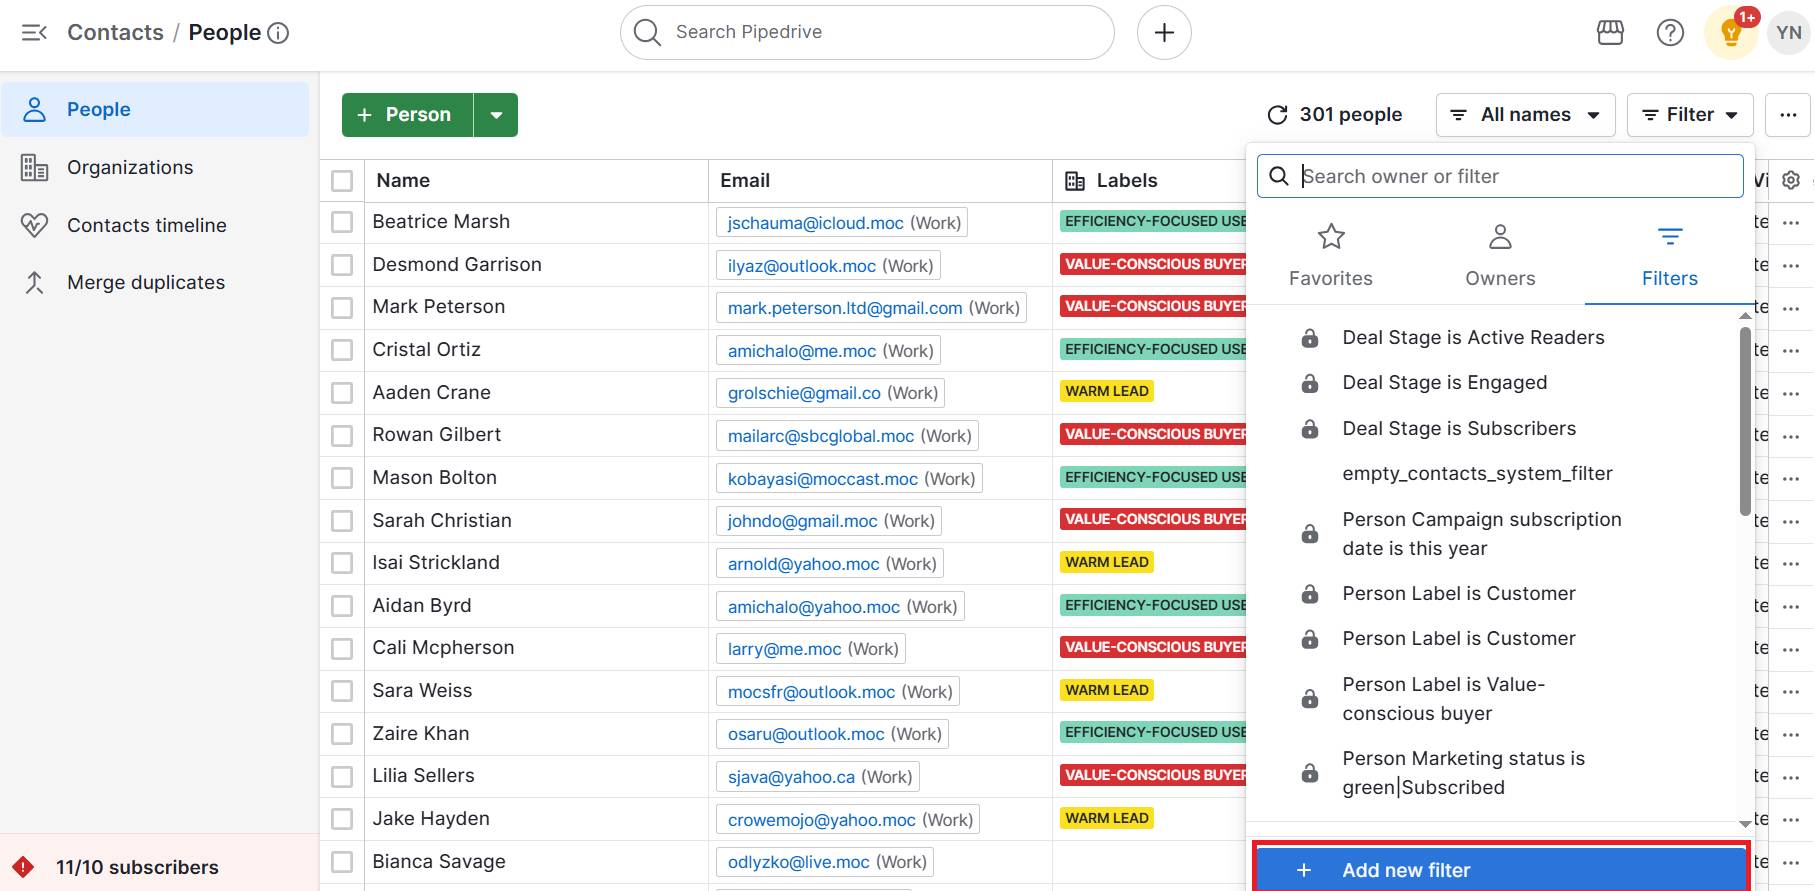
Now, create a condition that targets a specific group. For example, you can filter for all contacts whose “Preferred city” is Denver and “Target price range” is $750k–$900k.
Then, send a group email with hyper-relevant real estate marketing content. With your new filter active, you have a curated list of best-fit prospects with the same goals.
Select all the contacts in the filter, click the “...” button and choose “Send group email”. (This requires Pipedrive’s Campaigns add-on).
The complete guide to real estate sales
Send them a targeted message, like a quarterly market report for Denver or a new listing that just came up. It’ll prove you’re an expert who pays attention to their needs
IDX in real estate FAQs
Final thoughts
IDX turns your website into a property search tool for your local market. Instead of sending potential buyers to large portals, you provide everything they need under your brand.
A successful IDX website means more leads to manage. The challenge is giving everyone the attention they deserve without letting anyone slip through the cracks.
Try Pipedrive’s CRM free for 14 days and see how it can help you organize every lead into a visual sales pipeline, so you always know who to follow up with next.


